Headers & Sections
The concept of content management on pages in Alfred is to create dedicated sections/headers and fields within them rather than just one WYSIWYG editor. Of course this kind of editor is also possible to be used but only in places where it is really needed, mainly as a text area in a single section. Try to give to Alfred User as many options as needed and at the same time lowerise the risk of destroying the site appearance as much as possible.
1. Introduction & idea
Every page created in Alfred is based on Section Builder thanks to that Alfred Users can create sections/headers and manage content. Every section type has several dedicated fields where user can put content.
For example: if the design of some section has headline, text and buttons - those 3 types of content should be reflected by dedicated fields in section for Alfred Users, represented by microcomponents. In many cases, due to custom design of many sections, it is required to create custom microcomponents in order to give Alfred Users an easy way to manage content and to meet the requirements of some section design.
1.1. Example of section design

1.2. Example of this section’s fields in Alfred via the Section Builder
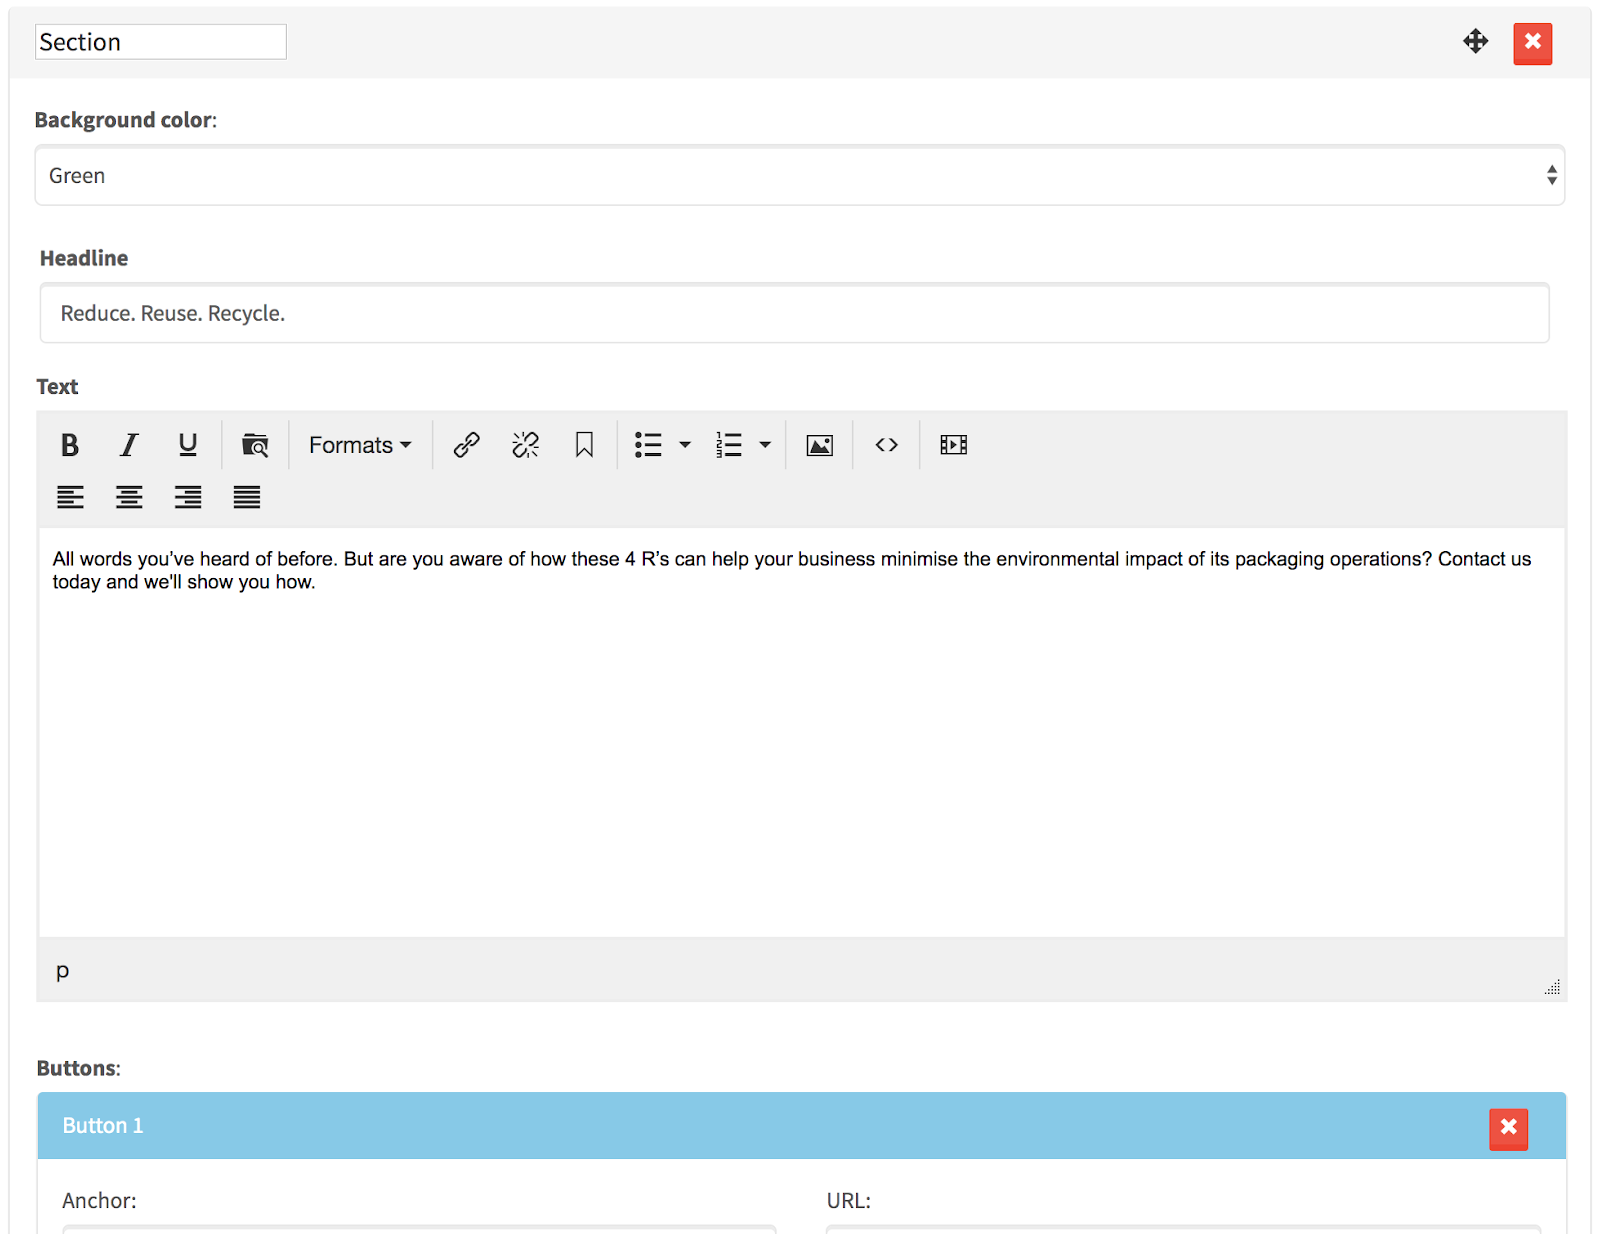
As soon as some section field is filled out by Alfred User, their values are saved under dedicated indexes in JSON format in dev_content / content table columns of pages table in the database. Then on the front page, in the section blade templates, you can print their values in a specific way (please see Microcomponents and examples how to display them on the front page).
Alfred in basic, plain version has several ready column sections such as section-100.blade.php, section-50-50.blade.php, section-25-25-25-25.blade.php, section-70-30.blade.php and so on. Please keep them as they are and do not touch their code unless the specific, custom design requires some changes to be made in them.
2. Section creating in new vs old Alfred version
Creating a section depends if you use a newer or older Alfred section. To recognise which one you use, you should go to resources/views/Website/Sections folder. If there is the jsons folder, it means you use the newer, improved version of Alfred.
The only one difference between a new and an old version of Alfred in terms of section creation is the place where the section settings (in JSON format) are being saved.
In newer Alfred, the JSON settings of every section are being created physically in the codebase, in the resources/views/Website/Sections/jsons folder. It means once a new section is created and you deploy it to staging / production, you do not have to do anything - the new section will just be available automatically once deployed.
In the older version of Alfred, the JSON settings are being saved in the sections database table (JSON settings are editable via Alfred CMS in the Settings → Sections section). It has one serious flaw - as soon as you have created a new section and you want to deploy it, once the changes are deployed to a different environment, you need to manually copy the JSON settings of the section from your local environment into the target environment via Alfred (Settings → Section templates).
3. Section Groups and the naming convention
We can divide the sections into 2 groups: headers and sections. Headers are often the sections that in the HTML start from <header> HTML tag. They should be presented in the top of page. The “just” sections are all the other ones below header. In Alfred, in the Section Builder, the headers are available at the top of section builder and all the other sections are below header.
It is good to follow the naming convention which says that headers’ names should start from “header-” prefix and all other ones from “section-”.
Example: header-simple.blade.php, header-50-50-with-image.blade.php, section-standout-cta.blade.php, section-100.blade.php, section-product-list.blade.php etc.
4. How to create a new section or header?
In order to create a new section, you should go to resources/views/Website/Sections folder and create a new PHP template file with a proper name following the naming convention, for example: section-standout-cta.blade.php or header-hello-world.blade.php. First of all, you should copy & paste the HTML code responsible for the section from front-end HTML page into that blade template.
Next step is to create the section type for Alfred Users so they can edit the fields. You can use the full example of section/header JSON configuration from Code Snippets and just adjust it to your needs.
In newer Alfred version, in the resources/views/Website/Sections/jsons folder, you should create a JSON file with exactly the same name as the section, example: section-standout-cta.json. In older Alfred versions, you should just log in to Alfred and go to Settings → Section templates and find the section-standout-cta template and click it so you can edit the JSON settings directly within Alfred. Below you can find sample JSON settings of one of the settings.
{"name": "Standout CTA","description": "It is the section description","type": ["page","homepage"],"group": "special","components": {"bg_color": {"order": 1,"type": "bg-colours","label": "Background color"},"headline": {"order": 2,"type": "tinymce","options": "basic","label": "Headline"},"text": {"order": 3,"type": "tinymce","label": "Text"},"btns": {"order": 4,"type": "btns","label": "Buttons"},"section_anchor": {"order": 5,"label": "Section anchor","type": "input"}}}
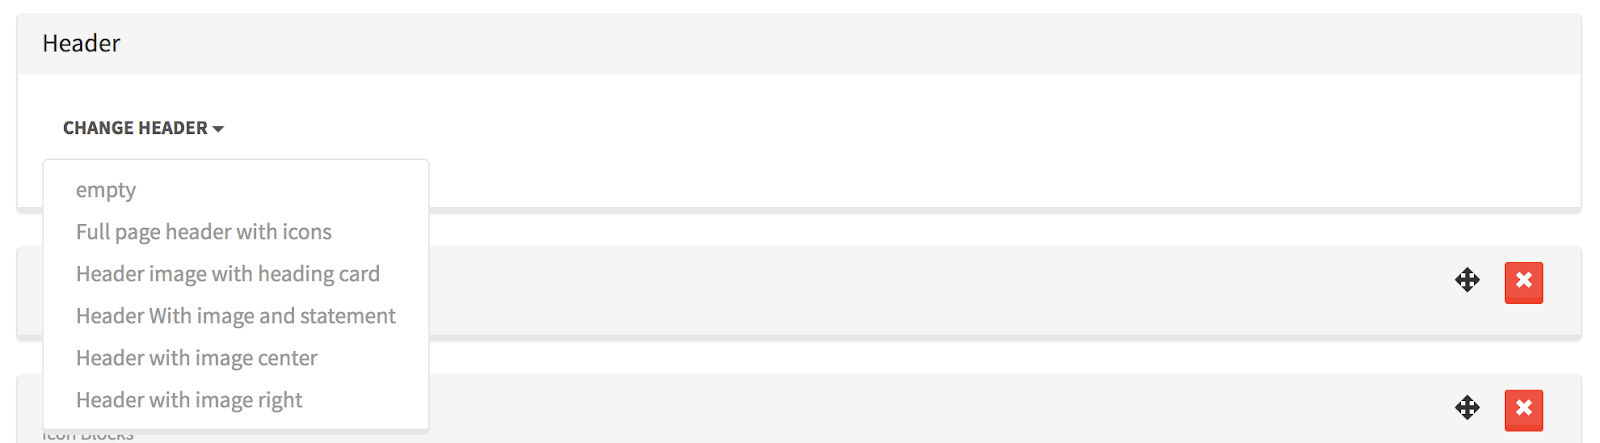
The headers are visible for Alfred Users in the Header option in the Section Builder:
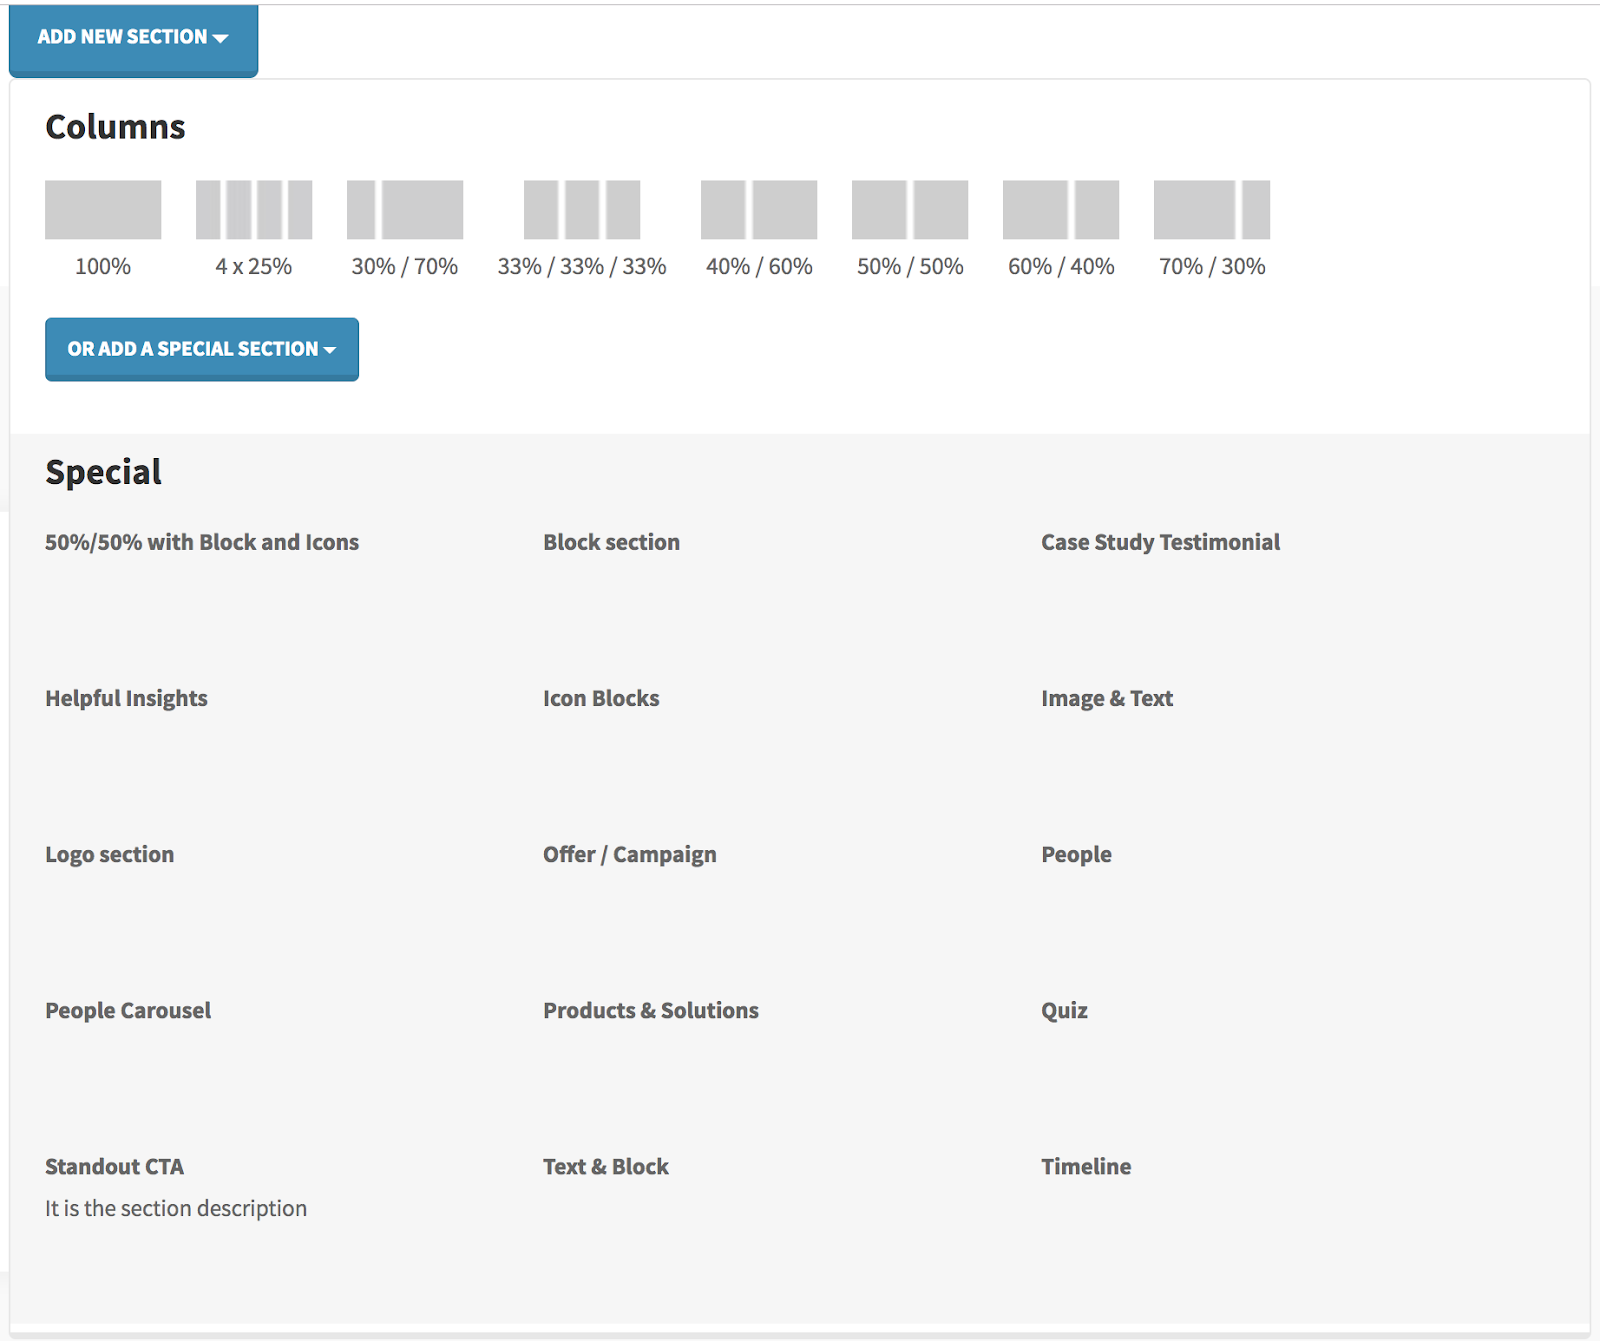
The sections are visible for Alfred Users in the Add new section option as on the screen shot:
Sometimes, on pages such as single blog post, single case study etc. where the ability to set header is not needed, the Section Builder might look differently:
As on the screenshot, there is no ability to set a header (because of website design and there’s no need for that) and the sections dropdown looks simpler. The sections do not have to have the “type” defined (the explanation what it is you can find in the next section of this documentation).
5. Explanation of the JSON settings
- name - it is the section name visible for Alfred Users in the section dropdown where they can choose a section.
- description - it is an optional setting thanks to which you can describe the section purpose and its options (see the screenshot above how it displays).
- type - it defines which modules the section will be available in; if you want to display some section as a header, please add “-header” suffix.
Example for headers:
"type": "homepage-header","type": "page-header"; Example for sections:"type": "homepage","type": "page" - Group - please take a look at the screenshot above; the section dropdown is divided into 2 groups: Columns and Special - if you set the type as
special- the section will be visible under the Special group, if the type iscolumn- it will be available in the Columns group. - components - it is a list of all the fields visible for Alfred User in a section that user can edit; every element of the list defines one field; the element index name is the index under which the value of that field (what user edits) will be saved in the dev_content / content JSON and you can retrieve the value on front page in specific section blade template under that index too. Below you can find the settings per each field:
- order: it defines the order of fields in a section in Alfred
- label: it is the headline / label which should help Alfred User what the field represents.
- type: it is the name of microcomponent name which the field uses to display for Alfred User; please see Microcomponents section;
- cms_width: it is an optional settings thanks to which you can define layout of the fields in section for Alfred User; because Alfred panel uses Bootstrap Grid, the value for cms_width should represent number of specific column width following the Bootstrap Grid (12 column layout) - for example cms_width: 6 will display the field in 50% of section width (only for Alfred Users in that section!).
6. General thoughts
Creating new sections and their fields is developers’ responsibility. The index names should be clear and semantic. Please use the snake_case naming convention. It is extremely important to remember about creating ‘if’ conditions in the front page blade templates to check if some index in the JSON content exists, before displaying its value.
@if (!empty($components->headline))<h2 class="headline-2">{{ $components->headline }}</h2>@endif@if (!empty($components->text)){!! $components->text !!}@endif@if (!empty($components->btns))@foreach($components->btns as $button){!! HTML::button($button) !!}@endforeach@endif
Remember that fields in any section could NOT be filled out by a user and always test on the front page how the section elements look on the front page when some of the fields are empty. This way you will notice that the ‘if’ conditions should sometimes be round whole elements (as in the example above - the <h2> is ‘if-ed’ as a whole thing, instead of ‘if’ inside the <h2>).
7. Front-end code implementation in the section/header blade templates
Let's look into a standard example of section front-end code that you have to create a section, selectable in Alfred, for:
<section class="section section--p-extra-small-top bg-white"><div class="container-s"><div class="row row--g-24 row--no-pb align-items-center content"><div class="col-lg-4 content__large-text text-center text-lg-left"><h2 class="headline-3">Some headline</h2><p>This is <strong>some text</strong></p><a href="" title="" class="btn btn--primary btn--mt btn--cream">CTA button</a></div><div class="col-lg-7 offset-lg-1"><figure class="image-frame image-frame--landscape"><source srcset="/images/tmp/smart-storage-min.png?w=500" media="(max-width: 499px)"><source srcset="/images/tmp/smart-storage-min.png?w=768" media="(min-width: 500px) and (max-width: 767px)"><source srcset="/images/tmp/smart-storage-min.png?w=920" media="(min-width: 768px) and (max-width: 991px)"><source srcset="/images/tmp/smart-storage-min.png?w=640" media="(min-width: 992px) and (max-width: 1119px)"><source srcset="/images/tmp/smart-storage-min.png?w=840" media="(min-width: 1200px)"><img class="image-frame__image-abs lazy" data-src="/images/tmp/smart-storage-min.png" width="828" height="538" alt=""></figure></div></div></div></section>
In order to turn this code as a Alfred section that should be editable via Alfred, you need to read the CSS classes and HTML elements to understand what and where should happen. You have to replace some of the original CSS classes and elements prepared in the front-end code with represented microcomponents' code that will be responsible for returning the particular settings and make the look & feel matching the design.
See example of correct implementation in Alfred section blade template below: Compare the original front-end code above.
<sectionclass="section@include('Website.Sections.columns-sections-partials.section-settings')">@include('Website.Sections.columns-sections-partials.background')@include('Website.Sections.columns-sections-partials.overlay')<div class="@include('Website.Sections.columns-sections-partials.container-settings')"><divclass="rowrow--g-24row--no-pbalign-items-centercontent@include('Website.Sections.columns-sections-partials.row-settings')"><divclass="col-lg-4@if (!empty($components->settings)){!! HTML::fontSize($components->settings, 'text_size') !!}@endiftext-centertext-lg-left">@if (!empty($components->headline))<h2 class="headline-3">{{ $components->headline }}</h2>@endif@if (!empty($components->text)){!! $components->text !!}@endif@if (!empty($components->btns))@foreach($components->btns as $btn){!! HTML::button($btn) !!}@endforeach@endif</div><div class="col-lg-7 offset-lg-1">@if (!empty($components->image)){!! Imgix::imageCustom($components,'image','image_alt','semi-full-width-image','image-frame__image-abs','image-lazy')!!}@endif</div></div></div></section>
8. Default sections
By default, Alfred has several built-in column sections (100%, 4x25%, 50%/50%, 60%/40% etc.). Please keep them unchanged if possible unless there is a real custom design need.